Hygiene and sanitation
Why is hygiene and sanitation important?
The second emergency after an initial disaster is disease outbreak. Improper hygiene and sanitation lead to deadly diseases like typhoid, dysentery, and cholera. These sicknesses are bad enough normally, but during a disaster when hospitals and doctors aren't around, they can be deadly.
The most important rule during any emergency is to keep yourself and your living area clean. Today, we rely on flush toilets, running water, and trash pickup to take care of our waste. When those services stop working, it's easy to get lazy about hygiene. You can't let that happen, or your family will get very sick. Storing hygiene supplies ahead of time and knowing how to use them is key to staying safe.
If a disaster like an earthquake happens, follow these rules for your plumbing:
- Turn off your main water valve: This keeps possibly dirty outside water from getting into your home's pipes. Leave it off until officials say the public water is safe again.
- Stop using your drains: Do not flush toilets or pour anything down your drains until you know the sewer lines are fixed. Using broken pipes can flood your home with sewage or cause major problems for the workers trying to fix the city lines.
Hygiene and santitation action list
- Gather hand washing supplies.
- Gather supplies for cleaning your body.
- Create a two bucket sanitation kit.
- Gather other emergency sanitation supplies.
- Add hygiene and sanitation supplies to disaster supply kits.
- Gather supplies for laundry, washing dishes, and keeping your living area clean in an emergency.
BONUS: Practice proper outdoor hygiene and sanitation by going camping. Learn how to safely create and use a latrine.

Hygiene
Hygiene is all about keeping your body clean through regular washing, brushing teeth, and grooming. Proper hygiene is important to not only stay physically healthy, but also for personal comfort, mental health, and a feeling of normalcy. Feeling dirty, itchy, and smelly makes it hard to stay positive. Also, when you are stressed, your body has a harder time fighting illness.
Hand washing
Hand washing with soap and water is the easiest way to stop disease from spreading. If you don't have soap and water, use hand sanitizer that is at least 60% alcohol.
How to wash your hands the right way
- Wet your hands with clean running water (warm is best).
- Use bar or liquid soap to get a good lather going.
- Scrub every part of your hands for at least 20 seconds. (Singing the "ABC Song" slowly is a great way to time it.)
- Rinse your hands well with clean water.
- Dry off with a paper towel. Use that same paper towel to turn off the faucet so you don't pick up fresh germs, then throw it away.
When to wash your hands
- Before eating or making food
- After using the bathroom or helping someone else use it
- After coughing, sneezing, or blowing your nose
- After touching animals
- Before and after helping someone who is sick or hurt
- After touching trash or other waste
- After touching flood or contaminated water
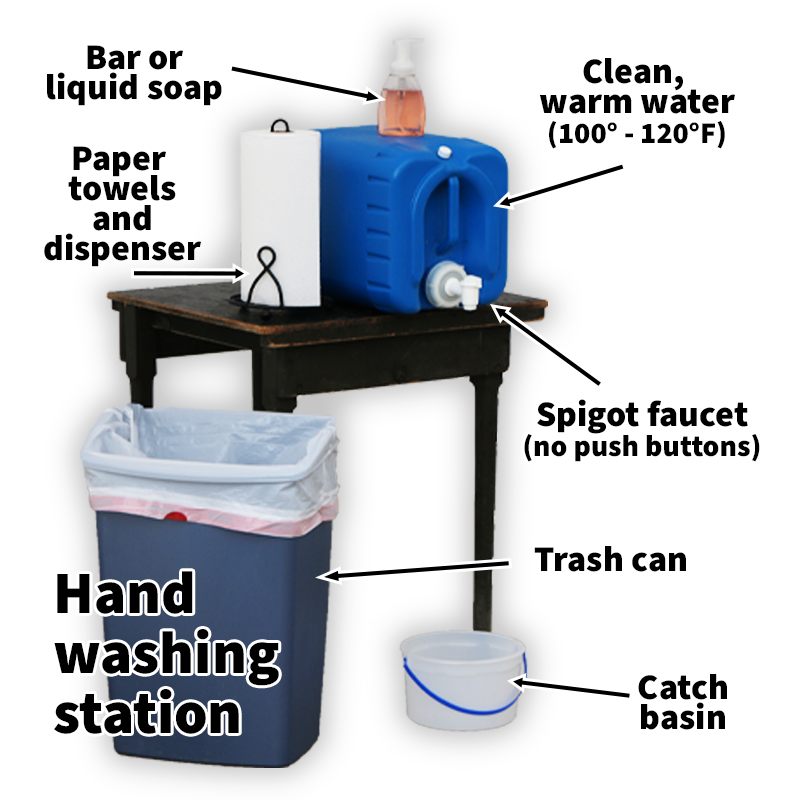
Hand washing supplies
- Five gallon jug with a spigot style faucet
- Bar or liquid soap, anti-bacterial if possible
- Hand sanitizer
- Nail brush
- Paper towels
- Paper towel dispenser
- Trash can
- Garbage bags to fit trash can
- Catch basin for water
- Spray disinfectant
Cleaning your body
When clean water is limited, long showers are a luxury you can't afford. But you can still stay clean with very little water.
- Wipes: You can use baby wipes or bath wipes to clean your whole body. Start at your head and work your way down to the dirtiest areas last (feet and groin). It isn't as good as a shower, but it works for a few days to get rid of sweat and dirt.
- Sponge bath: If you have a little extra water, dip a washcloth or sponge into a bucket of warm water and use it to wet your body. Then add soap to the cloth, and scrub from head to toe. Rinse the cloth with clean water and wipe the soap off your body.
- Camp shower: You can also use a camp shower for rinsing, but it may use more water. Some camp showers store the water in black bags and can be left out in the sun to warm the water for when you are ready to use it. You can also warm water by painting buckets and two-liter pop bottles black, filling them with water, and leaving them in the sun for a few hours. These are then easily brought indoors for bathing, cleaning, and other washing needs.
Don't forget your teeth and hair
Brush your teeth every day, even in an emergency. A clean mouth feels great, and it prevents painful toothaches when there may be no dentist around.
Important: Only use clean, treated water to brush your teeth. In an emergency situation, clean, drinkable water may not be easy to get. Conserve the water you have, but not at the expense of proper hygiene and sanitation.
Finally, taking a moment to comb your hair can make you look and feel better. Take time to take care of yourself during stressful times.
Hygiene supplies
- Bar or liquid soap
- Nail brush
- Washcloths or sponges
- Toothbrush and paste
- Dental floss
- Mouth wash
- Comb or hairbrush
- Shampoo and conditioner
- Hand or body lotion
- Lip balm
- Razor and shave cream
- Facial tissue
- Fingernail clippers
- Baby or bath wipes
- Small non-glass mirror
- Clean three to five gallon bucket
Sanitation
Expelling our bodies of waste is an important part of everyday health. During an emergency, normal toilets might not work. Having a clean and easy backup plan helps your family stay healthy.
When people do not feel comfortable using what exists, they often try to "hold it." Waiting too long can cause cause major digestive problems needing medical help, which may not be available during an emergency.
Things to plan for
- Privacy: Using the restroom is something private and most people cannot go if they feel they can be seen. Use the existing restroom if it's available, an extra room, or hang tarps in a corner of the yard to build a private stall. You can also buy a pop-up privacy tent.
- Location: Keep the toilet close enough that family members can find it easily, but far enough away to keep bad smells and waste out of your main living space. Using an existing home bathroom often works best.
- Ease of use: Keep it simple. Make sure everyone in your family can use it safely. Most family members will prefer a seat that will support their body weight so they do not have to squat.
- Cleanliness: You can’t just “go behind the tree in the backyard.” Never leave waste on the open ground. Uncovered waste attracts bugs and rodents that spread dangerous diseases.
Set up a hand-washing station right next to the toilet with soap, clean water, paper towels, and hand sanitizer.
Regularly sanitize frequently touched areas. - Safe waste disposal: Always wear disposable gloves when handling waste bags or cleaning the area. Dispose of or sanitize any article of clothing or object that comes in contact with the waste. Bury it if you have the means, otherwise plan on short term storage until another means of disposal is available. Never throw waste into rivers, streams, canals, or other areas with flowing water.
Two-bucket toilet system
Using two separate buckets for liquid and solid waste is a clean and safe way to handle human waste during an emergency. Separating urine and poop is important because they are thrown away in different ways. Standard buckets are strong enough to hold a person's weight and are easy to move. They can be used indoors or outdoors, and you have the safety of a rigid container for transporting waste to the disposal area. You can buy toilet seats online or at a hardware store that snap right onto standard buckets. You can also store your emergency bathroom supplies inside the buckets when you aren't using them.
Bucket #1: Urine (pee only)
- Do not put a plastic bag in this bucket.
- Pour it outside after each use in the yard, spread over the lawn, or over gravel where it will safely dry up.
- Rinse the bucket with water so it is ready for the next use.
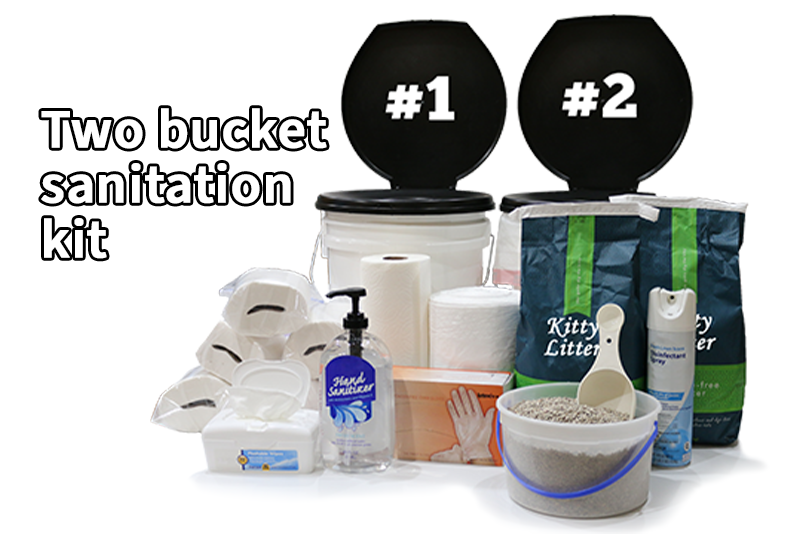
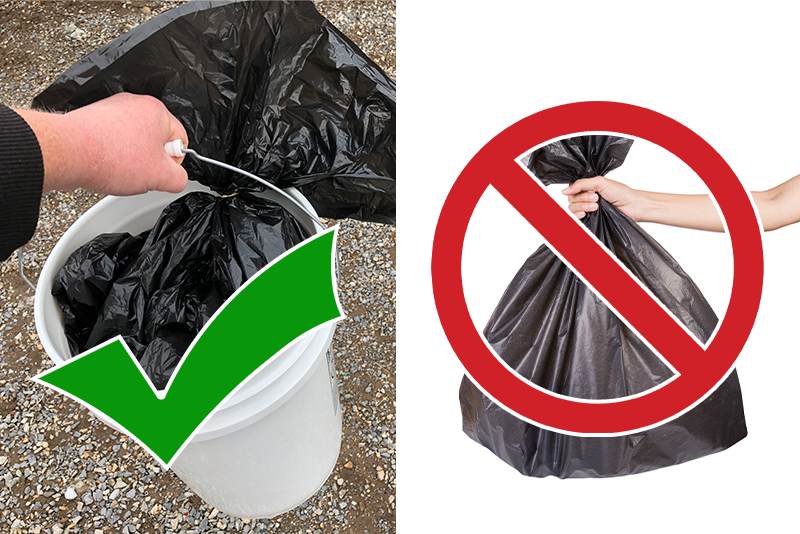
Bucket #2: Fecal waste (poop only)
- Line this bucket with two heavy-duty plastic trash bags.
- Put a one-inch layer of kitty litter at the bottom to soak up moisture and stop odors.
- Keep extra kitty litter and a scoop nearby. Every time someone uses the bucket, cover the waste completely with about two cups of kitty litter. If it smells bad, add more litter.
- If you run out of kitty litter, you can use dry items like crushed leaves, grass, shredded paper, cardboard, sawdust, or small wood chips.
- When the bag is full, put on disposable gloves, a mask, and eye protection. Tie both bags shut tightly with twist ties.
- Always carry the full bag inside the bucket when moving it outside so the bag does not rip open.
- Clean up any spills immediatley with a disinfectant.
Option 1: Temporary storage
- This is only a short-term option until normal service resumes, or landfills and other dumping areas are available.
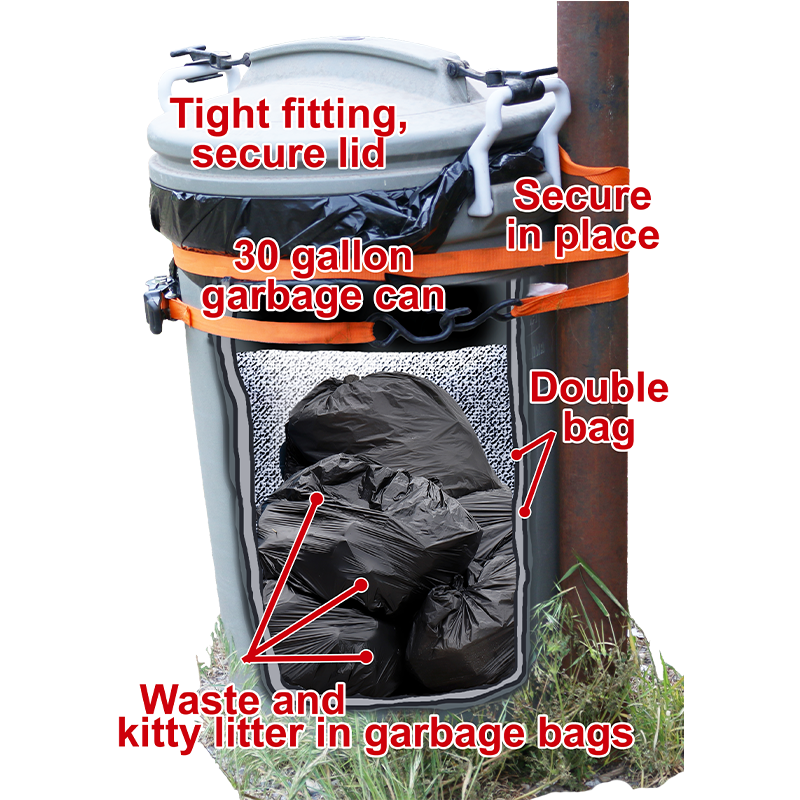
- Use a large trash can (30 gallons or smaller) with a tight fitting, locking lid to hold full bags if you cannot bury them right away.
- Line the trash can with two heavy-duty trash bags.
- Keep the can outside on a balcony, in a garage, or backyard. Tie the can to a post or tree using ropes, straps, or bungee cords so animals or wind cannot knock it over.
- If you must keep it inside, place it far away from where people live in a room with plenty of fresh air.
- Leave the waste bags tied closed when you drop them into the storage can.
- Spray the outside of the trash can with disinfectant spray every time you add a new bag.
- Contact your local health department for instructions on further disposal.
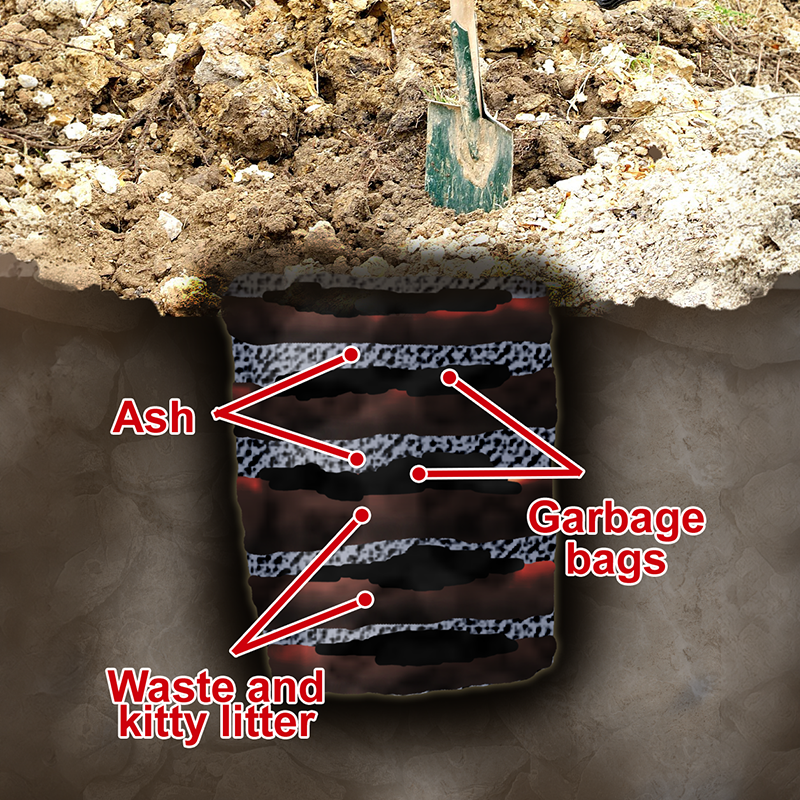
Option 2: Bury the waste (best choice)
- Dig a hole only if you are at least 200 feet away from any water supply or homes. Don't bury it in your garden.
- Dig the hole 2.5 to 3 feet deep and about 12 to 18 inches wide.
- Untie the waste bag and dump the poop and kitty litter directly into the hole. Throw the empty plastic bag into the hole, too. Modern bags break down in a year or two. The waste must be out of the bag so it can properly break down in the dirt.
- Throw your used disposable gloves into the hole and cover it all with a layer of dirt.
- Add a layer of cold wood ash or lime powder to stop pests from digging.
- Cover the hole between uses with boards and heavy objects to keep children and wild animals out.
- Stop adding waste when the hole is filled up to 1 foot from the top.
- Fill the rest of the hole with dirt and stomp it down. Add another layer of cold wood ash or lime powder, then cover it with more dirt and pack it down tight.
Keep your home clean
Take off your gloves, mask, and boots and leave them outside when you are finished handling waste. Thoroughly wash your hands afterwards. Never track germs back inside your home.
Other potty options
An emergency by definition is an unexpected event. You may find yourself without your two bucket sanitation system because you didn't get one or you are not home with your emergency supplies. You can still stay clean and safe by using these simple options instead.
House toilet (without water)
You can use your regular toilet even if the water stops working. You are already set-up with all the conveniences of home, you just need to make some modifications.
- Turn off the water supply valve behind the toilet.
- Empty all water from the tank and the bowl, but don’t flush it unless you know the sewer pipes are ok.
- Disinfect and dry the bowl.
- Plug the bottom hole so sewer gas cannot leak into your house. Put a hard rubber ball (like a racquetball or lacrosse ball) inside the toe of an old sock. Rub a little vegetable shortening on the sock to help it slide, then push it tightly into the bottom hole of the toilet bowl. Pull the sock to take it out later.
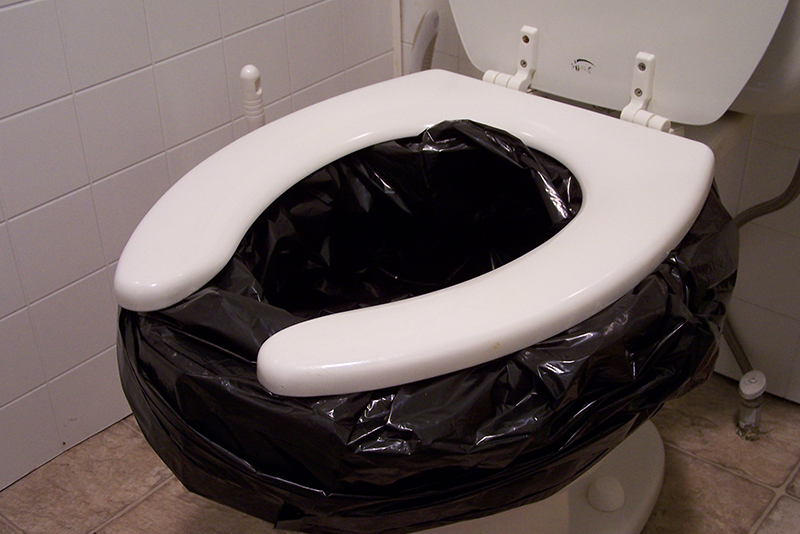
- Put two heavy-duty trash bags inside the dry toilet bowl. Keep using a separate bucket for pee, and only use the lined toilet for solid waste.
- When the bags are full, move them to a bucket so they do not rip while you carry them outside.
Disposable sanitation bags
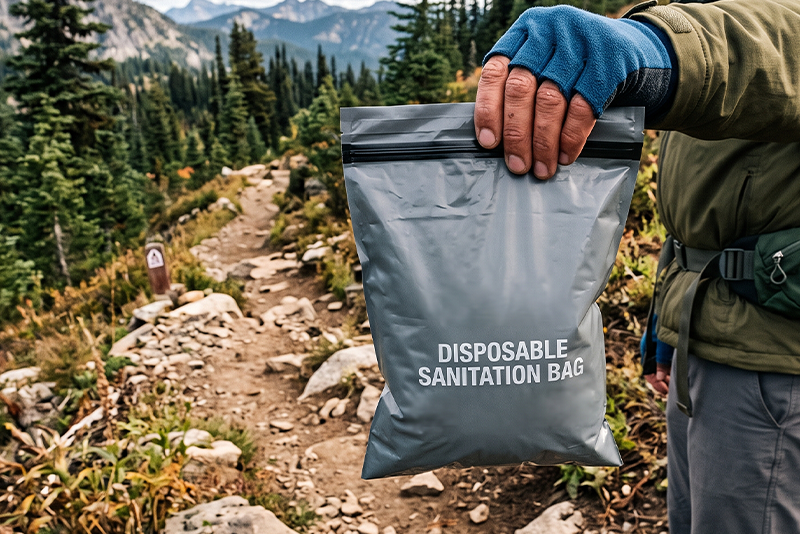
- You can buy special toilet bags at camping or emergency stores. They are easy to pack in a car, backpack, or emergency kit.
- Some bags are made only for liquid waster like pee or vomit. They hold powder that turns liquids into a thick gel.
- Other bags are for solid waste. They use chemicals to break down the waste and makes it inert.
- Once you tie these bags closed, you can throw them away in a regular trash can.
- There are many different brands. Talk to your local outdoor recreation retailer or emergency preparedness dealer for what would best fit your needs.
Trash can, pot, or training potty
- Use trash cans or large pots only if you have no other choices, like during a emergency at school or work. Set up one can or pot for liquid and another for solid waste. Add garbage bags and a layer of shredded paper at the bottom to soak up extra moisture. Be careful when sitting on a trash can. It can tip over or break under your weight. Clean up any spills right away.
- A training potty is lower to the ground, making it much easier for young kids to use, even if they are already trained.
Sanitation supplies
- One month supply or more of toilet tissue
- One month supply or more of feminine hygiene
- One month supply or more of disposable diapers or cloth diapers as needed
- One month supply or more of baby wipes
- Supplies for a saniation privacy shelter: rope, tarp, clothes pins, or a store bought privacy shelter
- Two bucket toilet kit:
- Two 5-gallon buckets with handles
- Two bucket style toilet seat lids (find at emergency supply stores)
- Box of heavy duty plastic bags for buckets
- Twist ties to close bags
- Bucket of kitty litter
- Scoop
- Spray disinfectant
- Box of disposable gloves
- Additional bags kitty litter
- 30-gallon garbage can with tight fitting lid
- Box of heavy duty bags for garbage can
- Digging tools: shovel, pick, digger bar - think about your ground in sumer and winter
- Rope or strap to secure garbage can
- Bucket of wood ash or lime (Use caution)
Disaster supply kit: Hygiene and sanitation
Disaster supply kits need to be unique for each individual according to your own needs, abilities, and wants. "Be ready" with the right hygiene and sanitation items in your emergency kits.
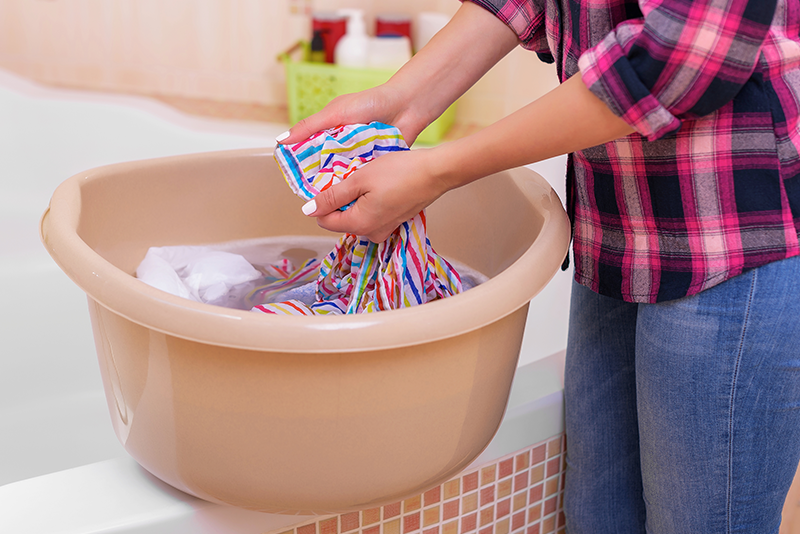
Cleanup in an emergency
Washing dishes and laundry by hand are important skills to have. Additionally, disasters create a lot of toxic and safety hazards. Cleaning them up can be dangerous if you don’t use proper precautions.
More information
Videos
- The Be Ready Buzz: Hand washing and hygiene
- The Be Ready Buzz: Being clean and bathing in an emergency
- PrepCast: Hygiene
- PrepCast: Sanitation
- 20 to Ready: Emergency toilet
- 20 to Ready: Keeping clean
- UDOH: Wash your hands!
- CDC: Clean hands help prevent the flu
- CDC: Fight germs. Wash your hands!
- ADA: How to brush your teeth
Downloads
Links
- Disaster supply kit: Hygiene and sanitation
- Garbage and trash in an emergency
- Clean and sanitize in an emergency
- CDC: When and how to wash your hands
- CDC: Hygiene in emergency settings
- CDC: Safe and healthy diapering for emergency settings
- CDC: Septic and onsite wastewater systems in disaster
- CDC: household cleaning and sanitizing after emergency
- CDC: Potential sanitation solutions during an emergency response
- CDC: Reducing risks to workers handling human waste or sewage
- CDC: The need for latrines and toilets
- CDC: Clean up safely after a disaster
- UofU Health: Does hand sanitizer work?
- National Park Service: Maintain personal hygiene while camping
- National Park Service: Remote waste management